The first setup of a smartphone on android. How to set up an android smartphone after purchase? Contacts, calls, messages
Most people buying a smartphone assume that they will be able to install a lot of programs on it, improve performance and speed, but the main thing is to customize the phone to their needs. The flexibility of modern software is such that you can choose not just programs, but also individual firmware, both official and third-party. In this article, we would like to talk about the necessary minimum of programs for Android, each of them makes life easier - these are the best of the best. Some of these programs will work for you, some will not, but you will get a general idea of \u200b\u200bwhat you can do with your device. Unfortunately, most smartphone users do not even remotely imagine what can be done with them and how to change them. Let's try to correct this omission. Go.
What is root access and why do you need it
Getting root rights for an Android smartphone is akin to administrator rights on a regular PC. You will be able to install any programs, perform almost any actions with your phone. At your own peril and risk, but as a rule, with the right approach, this is not scary and simple. If you do not know why you might need root access, then I will give myself an example. Often changing phones, I don’t want to transfer all programs, settings, data every time with my hands. There is a Titanium BackUp program for this, it can save the state of the phone according to a certain schedule and I can actually create a clone of my device. Unfortunately, this program requires root access.
Another example is the manufacturer's built-in voice dialing in my phone, which is rigidly tied to pressing the central key. You can’t turn it off in standard ways, and the number of erroneous clicks is huge and annoying. With root access, I just uninstalled the corresponding program, I don't need it. There are many such examples, having root access you get full control over the phone.
How and when to do it. There are many instructions on the net for obtaining root access for specific phone models. I recommend that you carefully read the instructions for your phone and model. Also, it should be understood that you lose the warranty, and there is a chance to ruin the phone under an unfortunate set of circumstances. Also, when using most methods, you will encounter the fact that all data on the phone will be deleted. Therefore, it is logical to make a decision about whether you will root or not, even before you set up the phone completely. Ideally, this should be done on a new device.
If you do not even dare to root, then there is nothing wrong with that, setting up your Android smartphone is very easy and without any special operations. Let's see how.
Customize the appearance of the phone - wallpaper, lock screen, shell
In Android, you can customize literally every element of the appearance of the phone, it does not require any tricks. Let's start off simple, choosing wallpapers that will decorate your desktop. Considering that the desktop usually contains a large number of icons, widgets and they are often translucent, it is necessary to select light or dark pictures. Otherwise, you won't see important information. Since the pictures quickly become boring, I change them from time to time.
Android has a great interactive or "live" wallpaper, it's an animation that changes depending on the time of day or events. Quickly looking through the list of such wallpapers on my phone, I found a dozen downloaded ones - a forest with trees in the snow, a sunrise, a galaxy core, a pond with fish and plants, weather for your city. As you can see, the choice is very large. I will not provide links to all these wallpapers, they are easy to find in the Android Market and they are free.
Sometimes I get bored with animation, I want something calm and new. In this case, the PicSpeed Wallpaper program comes to the rescue. It has several thousand wallpapers, you can set the picture in different modes - on one screen, on several, on several with an offset. No special gestures are required, you can make a list of your favorite pictures. And again, everything is free.
 |
|
 |
 |
 |
 |
 |
 |
 |
 |
For those who are annoyed that after pressing the phone’s power button, the unlock screen appears and you again need to make unnecessary gestures, you can install an automatic unlocking program (as an option, Auto Unlock from Iwashi Soft). For me, this is not relevant, since there is always an unlock pattern (the standard security option on Android, you draw a pattern on the screen to unlock the phone). But even when using the unlock key, you can improve the ergonomics of the interface, add new features. But more on that below, for now I’ll move on to the program, which I consider one of the most successful for Android -.
I don't know why the best Android apps don't cost anything. For me, this remains a mystery, since similar programs for other platforms simply do not exist as a class, and if they do, they can do much less, and are obscenely expensive. So, Go Launcher (there is an EX version of it, the second one is better), is a shell that changes appearance your phone beyond recognition. Whether you need a different main menu, standby mode, unlock screen, and so on, I don't know. For myself, I came to the conclusion that this program is vital for me and there are several reasons for this.
The first reason is that in the main menu you can create folders for programs that collect everything that I do not need all the time. The second reason, which refutes the first one, is that you can place a branded widget on Go Launcher desktops, which will have small shortcuts to applications and quick access to them. Workplace spreads much better, and applications can be closed with one touch, as well as clear the phone's memory (moreover, you can specify which applications do not close). It turns out that from now on I don’t need the main menu so often, I manage desktops.
 |
 |
 |
 |
 |
 |


 |
 |
 |
 |
I will not say anything about how many themes for this shell exist. You can customize it for any modern OS, you can choose completely unusual types of desktop. But the main thing, perhaps, is not that the interface of this program is aesthetically close to me and it looks beautiful. It has many applications that enhance the capabilities of my device by an order of magnitude. For example, the first thing I installed was Go Locker, which is an unlock screen that allows you to choose different actions and can be designed in different ways. It copies both HTC Sense and Android 4, and simply has its own unique options for this application.

A description of all the features of Go Launcher will take more than one page of text, the shell is very comfortable, fast and stable. A large number of widgets allows you to customize the device for yourself. I recommend the program wholeheartedly.
Contacts, calls, messages
For many people, it comes as a revelation that you can replace the standard phone book, dialer, and messaging app. I'll start with a small utility - Operators of Russia. When you call, the screen displays information about the number of which operator you are calling from, and also indicates from which city or region. This is convenient when you are called from other cities, you will understand that you are calling back long distance and pay accordingly.
Samsung phones are rather inconveniently implemented common list calls, it displays both SMS and voice calls. Considering that I receive a lot of SMS from social networks, it becomes inconvenient to use the phone. For me, the solution was the DW Contacts / DW Phone program. In this program, I'm less interested in contacts, more in the dialer. First of all, a convenient list of calls, favorites, and so on. Unfortunately, the program is not very beautiful in terms of interface, which is somewhat annoying. But the functionality of this solution is very high. In particular, it is possible to set up call filters (black list), search by name and number, convenient presentation, integration with various messaging services (WhatsApp is built into the phone book). The pluses also include the fact that you can search for information not only in ordinary fields, but also in additional ones. Therefore, I made a Solomon's decision, my contacts remained standard, but I use the DW Phone dialer.
My requirements for a messaging program are not very complex. The need for individual notifications depending on the number, the possibility of archiving messages, both on the phone and outside it, a private folder that automatically receives messages from certain recipients. The external attractiveness of the interface plays a role, but not decisive.
Not surprisingly, I stumbled across Go SMS Pro (it's free, from the same developers that created the Go Launcher). Of the minuses that must be mentioned right away - the program has a very large set of settings and if you select a mode with all the features, then not the weakest phone will start to slow down (which, in my opinion, is unacceptable). Therefore, we select the simplest mode of operation, since all options are available in it, just to call you have to get into the program menu.
The appearance is configured, there is a filter by words, or by the sender's number. It is possible to enter certain numbers in a private folder, for access you need to enter a password. The status bar displays a message icon and a number indicating the total number of messages. System warnings can be replaced by those in the program. When typing, you can use a regular or pop-up window, there are additional sets of emoticons. The list can be continued indefinitely. I do not recommend using Go Chat, it is compatible with Facebook Chat, but in my case it caused problems with speed.
 |
 |
 |
 |
 |
 |
 |
 |
 |
 |
 |
 |
 |
 |
 |
 |
 |
 |
 |
 |
 |
 |
 |
 |
 |
 |
 |
 |
In general, the Go SMS Pro program allows you to work with SMS / MMS on a qualitatively different level. Sometimes I like the presence of a blacklist, as well as the ability to remove notifications from network services, since I do not need them.
In addition to this program, I use SMS Backup & Restore, a utility that allows you to save all your messages on a memory card. But SMS Backup to Gmail, creates a copy of your correspondence on Gmail. There are many such programs, as a rule, the disadvantage of free ones is that they do not save MMS.
Mail and browser
The built-in email clients for Android are sufficient for most users, but you always want something better, right? For example, you can look in the direction of such a program as ProfiMail, it came to Android with Symbian and is actively developing on this platform. The program is paid, so for many it will become a limitation. I got accustomed to the program of our compatriot AquaMail. The free version is limited to two mailboxes (and I just need two), when sending, an inscription appears in the signature that this program has been used (this does not annoy me, I write very little from the phone). Of the advantages that are obvious - support for filters, a fairly fast and easy interface. It is functionally superior to Android programs, but the main thing is that the developer is constantly tweaking something and working on his program.
 |
 |
 |
 |
 |
 |
 |
 |
 |
 |
With the browser, the situation is such that there are several programs, but alternatives to Dolphin Browser HD have not yet appeared. The beauty of this browser is that it is fast, has many add-ons for every taste, automatically syncs bookmarks with a desktop browser, and can pretend to be a regular browser from a PC (which is important for browsing without switching to mobile versions). Of the additional features that you instantly get used to, I’ll note gesture control and a quick call to certain pages. The browser also deserves a very detailed review, for now I'll just recommend it, it's definitely the best. Haven't seen any stability issues.
 |
 |
 |
 |
 |
 |
 |
 |
Music and radio
It seems to me that when discussing music it is difficult to find two people whose tastes coincide one hundred percent, it is possible that this feature of human nature is also transferred to the choice of music players for their phones. What can you think of for an ordinary player from what manufacturers have not implemented today? A lot, as practice shows. Considering that most of my music collection is stored in iTunes (much of it was bought there), the question for me initially was how to synchronize these files from Android smartphones (the second iPhone phone, this question was not there initially). While looking for a player, I came across DoubleTwist, this program is getting prettier month by month. The free version has everything you need for life, including streaming music to game consoles and AirPlay support, plus the ability to download tracks from iTunes from a PC (you can set a number of restrictions, for example, on volume). The program is cute and quite convenient, the paid version has Album Art download, equalizer support and a number of other goodies. But the free version is more than functional. Recently, the program also has video viewing. The pluses also include the fact that the program can download podcasts (without a PC).
 |
 |
 |
 |
 |
 |
 |
 |
 |
 |
The second and favorite player is Power AMP, it is paid, but it is inexpensive (about $ 5). Of the pluses, support for a large number of formats and the presence of FLAC. I use it to listen to FLAC, although I sometimes use the equalizers here as they improve the sound. Externally, the player is pleasant, although sometimes it seems that it is a bit heavy (when listening, there are slight brakes in the interface). From what I use, this is the download of lyrics (using the MUSIXMATCH service). In general, a solid five, this player is one of the most popular for mobile devices.
 |
 |
 |
 |
 |
 |
 |
 |
 |
 |
 |
 |
To determine the music that I heard somewhere and do not know, I use two programs - Shazam and SoundHound. Their capabilities are equivalent, but there are more additional options in SoundHound, you can immediately find a video on YouTube, learn more about the performers, and so on. In a word, I recommend.
To listen to podcasts, there is a wonderful BeyondPod program (paid), as an option, you can use Pocket Casts (also paid - $ 3). Both programs are good, you can choose any, they differ in details. In my experience, syncing podcasts from my PC is enough for me, although sometimes they need to be downloaded directly to my phone.
 |
 |

I will not talk about Last.FM and other similar services, the applications are free and you can easily find them.
Healthy lifestyle and sports
A completely optional set of programs that everyone will have their own. However, I would still venture to tell about those programs that I like. I'll start with the Libra weight manager, it allows you to record your weight and shows you how it changes. Quite a convenient program, there is a widget. Very simply and tastefully done, nothing superfluous, which captivates.
Eldar Murtazin ()
A fairly large number of users do not consider it necessary to configure their new smartphone. This would not be so problematic, but over time, certain inconveniences may arise. In addition, the user does not fully use all the capabilities of his device. In this article, we will talk in detail and simply about how to set up a smartphone after purchase.
The initial settings for smartphones based on Android and IOS operating systems are somewhat different. Since Android smartphones are more popular and massive, this article will show you how to set up an Android smartphone after purchase. I will write about the initial setup of the iPhone in the following articles.
Connecting a Google account
The Android operating system is owned and updated by Google. Therefore, after buying a smartphone, you need to link it to a Google account. Without an account, you simply cannot download and install the application from Google Play. If you already have an account, you can log in under it, otherwise you will have to create a new one:
We go into the settings of the smartphone, go to the Users and accounts section.
Click Add account.

Choose Google.

Enter your Google account username and click next. After we enter the password.

If you don't have a Google account, click create an account.


Come up with a login name.

This completes the Google account setup.
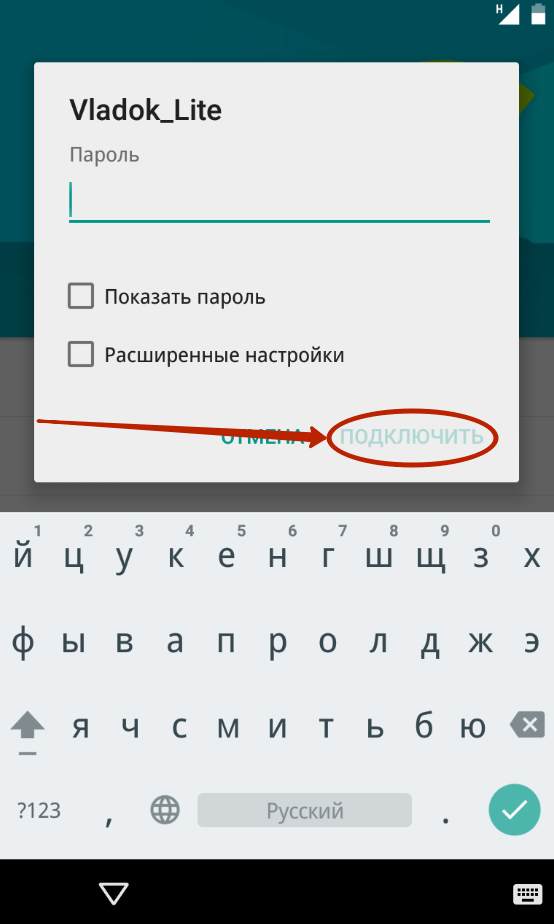
Setting up Wi-Fi on a smartphone
If the mobile Internet on many smartphones is configured automatically, then to connect to your home Wi-Fi network, you need to make certain settings. Wi-Fi connection will allow you not to spend the limited megabytes of the tariff plan, quickly install programs, updates for them, watch videos on Youtube, listen to music on Vkontakte and much more.
Go to settings section

We go to the Wi-Fi section.

Turn on Wi-Fi on your smartphone and select our home network (it usually has the strongest signal):

Enter the password for your home Wi-Fi network and click connect:

This completes the Wi-Fi setup on the smartphone. The Wi-Fi icon should appear at the top.
Pattern setting
It is important to set up the pattern of the smartphone after purchase. This is necessary, for example, to protect yourself from a situation where someone took your smartphone without asking and read all the correspondence. Also, many people use a mobile bank, so without a security key there is a high probability of losing their savings. Here we will not mention the fact that modern smartphones already have the ability to unlock with a face or fingerprint. These features will be discussed in future articles.
Go to Settings, Security and Privacy section.

Select the section Screen lock and passwords:

Select the Password section:

As an unlock method, select the Graphic key:

Then you need to draw your pattern twice and remember it.
Transferring contacts from a previous smartphone
An important point on how to set up a smartphone after purchase is to transfer contacts from an old phone. I will say right away that there are several ways to do this:
- With a Google Account
- Via computer (smartphone connected via USB)
- Using other programs (such as AirDroid)
- With a SIM card
We will not even write about the first three methods. The fourth is the simplest, consider it.
So, the essence of the fourth method is that you use your SIM card to temporarily store numbers. First, the SIM card is inserted into the old smartphone and contacts are copied from memory to the SIM card. After that, the SIM card is inserted into a new smartphone and the contacts from the SIM card are copied to the internal memory of the phone (but this is not necessary, you can store contacts on the SIM card).
Now let's figure out how to do it on an Android smartphone. To copy contacts, go to the section
Contacts and click More:

Select Manage Contacts:

Select the section Copy contacts:

Copy contacts from phone memory.

Select all contacts and click Copy.

And copy the contacts to the phone's SIM card:

After the complete transfer of contacts, we take out the SIM card from the old smartphone and insert it into the new one. Your contacts will appear in the new phone.
To fully customize your Android smartphone after purchase, you need to install additional applications. You can find the Play Market on the main screen of your smartphone.

If you do not know which applications to install, we can advise the following:
- Vkontakte is a popular social network
- Whatsapp - free chat and calls
- Telegram - free communication and calls
- Viber - free communication and calls
- Instagram is a photo sharing service
- Periscope - video calls
- Online Sberbank - mobile payments and transfers
- Kate Mobile - the same VK, but with the invisible function
- Public services - a service for obtaining state. services
- Yula - you can sell and buy goods
- Avito - the same as Yula
- AliExpress - profitable to order goods from China
- Yandex taxi - order a taxi
- BlaBlaCar - profitable trips with a companion
- Yandex Navigator - if you get lost
- Yandex Transport - see where your tram / trolley bus is located
- Yandex Trains - train schedule
- Tutu.ru train timetable
- Trivago – find a hotel at a bargain price
- Diverly Club - food ordering
- Burger King - coupons and discounts at Burger King
- 2 GIS - maps
- Clean Master - clean your phone
- Cian – rent/buy an apartment
- Badoo - dating service
- Delimobil - cashering
- Wallpaper HD - set custom wallpaper
- Zedge - set custom ringtone
Disabling automatic updates of the Play Market
When you turn on the mobile Internet or Wi-Fi, applications begin to update automatically. This greatly interferes with the work and we advise you to disable the update. To disable the update, go to the Play Market, pull out the left menu -> select settings.

In the settings, select Auto-update applications -\u003e Never.

Charging a smartphone after purchase
We talked about how to programmatically configure a smartphone. Now let's talk about charging a smartphone after purchase. You probably know that after buying a smartphone, the smartphone battery needs to be charged in a special way. This is true. A new battery requires "buildup". Let's explain what this means.

The new battery must be discharged to the maximum, that is, until the phone is completely turned off. Then you start charging it. When the smartphone reaches 100% charge, you can start using it until it is completely discharged. We recommend charging and discharging a new battery 3-4 times in this way. After that, use your smartphone in normal mode (that is, do not discharge to zero).
So, in this article, we have provided some tips on how to set up your smartphone after purchase. In addition, it is worth sticking a protective glass on your smartphone, buying a case - this will protect it during operation. May your smartphone never let you down 🙂
Subscribe to our
There is not much point in this material, because the Android operating system itself carefully talks about every step taken when you first turn on your smartphone or tablet. But some users want to know in advance what awaits them. It is for such people that this article is written. She also talks in detail about the steps at which certain difficulties may still arise. Our task is to ensure that you can easily configure the device so that its use is as comfortable as possible.
Phone setup is divided into two steps. You cannot skip the most important one - it is performed when you turn on the device for the first time and after each factory reset. Here the following actions are usually performed:
- The language is selected;
- Wi-Fi network is selected;
- Turning mobile data on or off;
- Data from a Google account is entered;
- The current date and time is confirmed.
Sometimes this whole thing is supplemented by entering data from other accounts - Samsung, Cyanogenmod and some others. So, let's take a closer look at the initial setup process:
Step 1. Usually, phone setup begins with the choice of language, which is logical. You will be offered a list of languages supported by this version of the operating system, from which you need to choose the one you understand. In our case, it will be Russian. After selecting it, click the " Further”, which in this case is shown as an arrow.
Step 2 Usually, the next step is to connect to a Wi-Fi network. Choose the one that is your home. You can skip this step by clicking the " Further". But it is recommended to do this only if a SIM card with connected mobile Internet is inserted into the smartphone.

Step 3 Enter the password for your home Wi-Fi network and click the " To plug».
Step 4 It is possible that a connection check will start next. It is possible that the device will also provide an opportunity to update the firmware. Also, the smartphone may offer to transfer data from another device running Android. This is done with a chip. . If you don't need it, click the " Skip».

Step 5 The full use of a smartphone is impossible without create a google account. It is most logical to enter data from the account that you used on your previous device. If you do not have such an account yet, then click on " Or create a new account". It is not recommended to skip this step, because otherwise the Play Market will not work for you.

Step 6 Enter your Gmail email address, click the " Further”, after which it remains only to enter the password, then again pressing the aforementioned button.

Step 7 Click the button To accept". By doing so, you agree to Google's privacy policy.

Step 8 Next, the system will prompt you to download the applications that were installed on your last smartphone. To do this, select the brand of the device you used, check the programs you need (you can leave a checkmark next to the “ All applications”) and press the button “ Further».

Step 9 The system will prompt you to activate Google services. It is recommended to leave checkboxes next to all items and click the " Further».

Step 11 Wait for the download and installation of all the applications that were used on the previous smartphone. This can be a very lengthy process.

This completes the initial setup. It should be noted that depending on the manufacturer of the device, the completeness of your actions will differ. Our example concerns only the "naked" version of the operating system. If you have a device from Samsung, or some other company, then you may be offered additional actions. For example, you may need to set the time and date, create an account in additional services, and activate a place in Dropbox or other cloud hosting.
Second phase
In fact, we have come to the point where the smartphone can already be used. But if you want to achieve maximum comfort, then it is better to continue tuning. In particular, you are not going to manually drive in all the contacts, are you? Much easier transfer them from the previous smartphone, using the corresponding function from Google. How this is done is described in detail in a separate article. If you repeated all the steps described above, then the entries should have already appeared in the contact book - provided, of course, that you have access to the global web.
Next, you can set up your email. The Gmail email address itself will already be entered in the parameters of the corresponding application. But you may have other email addresses, including those from websites "Yandex" and Mail.ru. They can also be added to the Gmail app. To do this, run the program and do the following:
Step 1. Pull out the curtain with the main menu from the left edge. Or just click on the three horizontal bars in the top right corner.


Step 2 Scroll down the list and click on " Settings».

Step 3 Click on " Add account» and follow further instructions.

A slightly more detailed question mail settings on android we have covered in a separate guide. And we once told you about how to change keyboard on android. This is also recommended to do first, because the standard keyboard may not suit you. Also pay attention to the material considering the question disable T9 on Android, especially for owners of very old smartphones.
Operating system management
If you have never used an Android smartphone before, you may not know what gestures are used here. Of course, the system itself will tell you about some of them at the end of the first stage of its configuration. But you still have to guess about most gestures. Or read about them below:
- Tap- a simple click on the selected element. You do not need to hold your finger for a long time - pressing should be single and fast.
- double tap- you are required to double-tap on the selected item. We can say that this is an analogue of a double click with the left mouse button.
- long tap- you need to hold your finger on the selected element for one or two seconds.
- Pinch- here you need to touch the display with two fingers, and then spread them apart. Or bring them together, depending on the situation. Typically, maps, web pages, and photographs are enlarged and reduced in this way.
- Swipe- this gesture consists in swiping your finger across the screen in one direction or another. This is how most actions are performed in the mobile operating system.
As for the interface in Android, it depends on the proprietary shell used. For example, Xiaomi smartphones do not have a menu - you need to look for shortcuts for all installed applications on desktops. Samsung devices still have a menu, so some desktop shortcuts can still be removed.

Desktop Samsung Galaxy A5
The general principle of using the operating system is similar on all devices - you need to navigate the desktops or menus, tap on the application icon and use it. Quick transitions from one program to another are allowed - for this, the corresponding button is used at the bottom of the screen or even below it.
You yourself can change the interface of your smartphone. To do this, pay attention to best launchers for android. They partially or completely change the appearance of the operating system. But you will have to pay for this with RAM - a certain amount of it will be occupied by the launcher.
Summarizing
In fact, setting up a smartphone is an immense topic. Modern devices allow you to change many parameters. But we tried to make it clear how to set up Android immediately after buying it. And change the wallpaper or set ringtone You can and after a few days or even weeks of using the device.
If you've just bought a brand new smartphone or tablet, you probably already want to start playing with it. But first of all, you need to configure. In this article, we will explain how to set up your new smartphone step by step.
1. Choose a language

Once you've launched your new smartphone, you'll be taken to a welcome screen where you'll be prompted to select a language. You need to select the desired language from the list provided and click on the arrow to continue.
2. Insert SIM card and enter PIN code
Next, you will be prompted to insert a SIM card. Sometimes inserting a SIM card into a smartphone is not as easy as it might seem. Sony mobile devices have a special rivet that needs to be opened to insert the SIM card.
To open the SIM card slot on Nexus smartphones, you need to use the pin that comes with the smartphone.
Most smartphones have a SIM card slot under the battery, for which you need to open the back cover.
Once you have inserted your SIM card, you will be prompted to enter a PIN.
3. Select a Wi-Fi network

If you are in range of a wireless network, you can connect to Wi-Fi immediately. Just select a network from the list and enter a password if required. Then click Connect.
3. Transfer data from an old smartphone

The next step is to copy data from another Android device. A useful feature if you have already used an Android smartphone before and want to transfer all your personal data to a new mobile device. If you have never used an Android smartphone before, or simply do not want to transfer data, click on "No, thanks."
4. Sign up / Sign in to your Google account

If you missed the previous point, then you will be asked to sign up or sign in to a Google account so that you can use Google apps and services such as Gmail or the Play Store.
Some manufacturers, such as Samsung, ask you to create another additional account that will allow you to use special services from this company.
6. Add a spare email address and set up security

If you have an existing email address that you would like to sync with your new smartphone, you can add it.

Next, you will be prompted to set up a PIN code on your smartphone: we strongly recommend that you do so. If you lose your smartphone, the PIN code will be the only way to protect personal data from an intruder.
7. Customize the display of new notifications

In this section, you configure the display of new notifications on a locked smartphone. You are offered three options:
- Show content of all notifications
- Hide sensitive notification data
- Don't show notifications
8. Install Google Now

Installing Google Now is the last step in the initial setup of your smartphone. Google Now is a smart assistant. Click "Next" to read more about Google Now.
9. Sign in to other services
Many smartphones come pre-installed with software such as Dropbox or Google Drive cloud storage systems. If you use any additional services, you will be prompted to enter them or register.
10. Insert a microSD card

If your smartphone is equipped with a microSD memory card slot, you need to insert it. This way you will have more storage space for photos, videos and some apps.
11. Install Android Updates

New Android smartphones come with factory settings and a basic set of apps. Shortcuts and widgets on the desktop are inconvenient and not harmonious. To change the default settings and prepare the smartphone for work, you need to carry out the initial setup of the phone, which we will discuss in this article.
Basic preparation of the phone for work
On the first phones, the owner's acquaintance with the Android OS was limited to brief explanations: this is the desktop, here is the application menu, and there are settings. Therefore, the user sometimes had to spend 1-2 hours searching, and at the same time studying the location of the necessary parameters in order to customize the android phone for themselves. Today, most manufacturers embed installer programs, where the initial parameters are set before starting work.
As an example of setting up a phone, we will consider the installer in Xiaomi smartphones with the MIUI shell. Other installers offer similar settings, but the differences are mostly in the design. Below we will take a look at what the installer looks like on the stock version of Android.
Action algorithm
Click on the circle with the pointer to start setting up.

In the next window, the system will prompt you to select the system language. Then specify the region to set the time, local values and more.


You will then be prompted to accept the user agreement.

If the SIM card is not installed, or inserted in the wrong direction, the system will inform you about it. You can also skip this step if you wish.

Adding a Google account is an important step in gaining access to the app store and other services of the search giant. Gmail is used as the account. If you have a mailbox, select "Yes" to enter and synchronize data. If there is no mailbox, click "No" and create an account. If you wish, skip the action, the account is entered at any convenient time.

When you enter your Google account, you will be prompted to back up your data. If necessary, skip this step and adjust the value later.

Also in Xiaomi smartphones, it is proposed to use a Mi account, where the user is provided with 5 GB of free cloud storage to back up data. You need to sign in or create a new account. If necessary, skip this step and adjust the value later.

If desired, activate the device search, which will allow you to find your smartphone in case of theft or loss.

Also, optionally set a password. Use available biometric security systems, and if none are available, set a numeric or symbolic password.

Allow or block the sending of diagnostic data and location access for apps. It's better to remove the marks.

Choose a skin style if your system contains multiple themes or skins.

At this stage, the phone setup is completed, about which a corresponding notification will appear.

And this is what the smartphone setup wizard looks like on the standard version of Android.


If you missed some points during the setup process, we recommend that you read the additional material, which will allow you to complete the initial phone setup.


System and Application Update
Open system settings and find the section about the phone and check for OS updates. If there are additional options, set the date and time to check for updates.

Then go to the Google Play App Store. Open the menu and select settings, where you can set your preferred update method. It is better to disable forced app updates or enable Wi-Fi only to save mobile traffic.

Transferring data and contacts
Have you used another device before? If yes, then you need to transfer data from the previous device to the new smartphone. For detailed instructions and recommendations on how to transfer phone records and other information, read in separate materials.
Antivirus protection
To protect your device and prevent malware from entering, you should install an antivirus program. The application is relevant for novice users and with frequent visit dubious resources.

Mobile Internet setup
Home Wi-Fi hotspot - perfect for downloading various content, including games and programs. For communication over the network, checking mail, updating the weather and other activities away from home, mobile Internet will come down. Find out from your mobile operator the most beneficial offers for you - a tariff plan or a package with free traffic. Also take care of saving traffic.


Connecting wireless accessories and setting up navigation
Do you use navigation or plan to connect a wireless accessory like headphones? Read the details of setting up and connecting in our separate material.
Transferring data from a computer
If you have media files or other content stored on your home computer, you need to pair your smartphone with your PC to transfer information. To do this, use a USB cable or a Wi-Fi network.
Screen setup
Open the smartphone settings, and then the picture or screen item. Set your preferred backlight brightness level. If your system supports blue light suppression, enable the option to improve your viewing experience at night. If there is no corresponding option, use third-party applications with similar capabilities.

Battery charge
After setting up your smartphone and exploring the possibilities for a long time, it's time to recharge the battery. Use the included adapter and USB cable. Also find out how to extend battery life from the article below.
Conclusion
Now you know how to set up a new smartphone after purchase and prepare the android device for work. For a better understanding, we recommend that you view related topics (links in the text), which contain detailed instructions and recommendations for setting up various functions of an android phone.