How to fertilize flowers. Secrets of watering vegetables and how to water flowers so that they grow better
When choosing a houseplant, we always pay attention to appearance leaves and flowers, shape. But each plant has its own individual energy, affecting the human condition.
A beautiful houseplant is, first of all, proper care and conditions of detention. Even small errors in care can lead to brown dry spots or drying out of the tips or edges of the leaves.
The temperature and humidity in the room also play an important role. And so that your flowers grow beautifully, magnificently and please the eye - listen to the advice of experienced florists!
Water is the main basis for the life of all plants. For each type of plant, watering should be individual.
Also, indoor plants must be fed if you want beautiful flowering and lush foliage.
- Sugar. The most natural way of fertilizers, for top dressing of indoor flowers. Sugar breaks down into glucose and fructose. It is glucose that does wonders.
It is the source of energy for all plant life processes. To prepare such top dressing, you need to dilute 1 tbsp. a spoonful of sugar in 0.5, a liter of water, or simply sprinkle the ground with sugar in a pot, and then pour.
- Castor oil. Ideal for flowering plants. You will need 1 teaspoon castor oil for 1 liter of water. When using castor oil: plants grow faster, bloom beautifully and do not get sick.
- Wood ash. Florists recommend it for the prevention of plant diseases. The most common way to use ash is to add it to a liquid.
Not a large amount, usually 100-150 grams of wood ash is diluted in a bucket of water, mixed and watering is ready. Apply ash no more than 1 time per month.
- Pomegranate peels or any citrus fruits. It is also a healing and wonderful top dressing. We take the crusts of any citrus fruits and fill them with water, leave it to brew for a day, and water it.
- Aspirin. Every two months, an aspirin tablet is added to the irrigation water. One tablet per liter of water.
If this condition is met, then the plants will be resistant to diseases, and their leaves will have a rich green color.
In addition, the growth rate will also increase.
- Aloe juice. It is a biogenic stimulant of plant origin. It is an ideal natural growth stimulator for plants. The use of aloe juice will help grow a strong and beautiful plant in a short time.
Preparation: dilute one teaspoon of juice in one and a half liters of water.
- Milk. Milk is recommended not only for watering (1 teaspoon per 1 liter of water). You can also wipe the leaves with a solution of milk and water in a ratio of 1:10.
After wetting a cotton pad with the prepared liquid, wipe the leaves once a week. The leaves will shine, giving their beauty and freshness.
In order for indoor plants to bloom and develop, it is necessary to carry out a regular transplant.
When transplanted, plants receive nutrients, and when replacing the land - the development of the root system. Spring is the best time to transplant.
For successful cultivation of indoor crops, proper watering is one of the most important conditions.
Irrigation is an important part of agricultural work. Without attaching importance to the rules of watering, thinking that the main thing is to water, you may have a situation similar to this: “I don’t understand anything, I water, I water, but there’s no point! Nothing grows in the garden." Through trial and error, you can come to an understanding of what needs to be done and how. We want to make this path easier for you, and we present the rules for watering plants.
Better less, but more water the plants!
Plants, like us, must "drink only the right and good water”, otherwise they will develop much worse than we would like.
The consequences of a moisture deficit sometimes do not affect immediately: in fruit trees, especially abundantly from those bearing fruit in a dry year, the peripheral roots die off, after a year or two the bark exfoliates, and the tree may die unexpectedly for the gardener. Therefore, we are convinced that watering "just in case" is always better than not watering.
And therefore, based on the bitter experience of many gardeners, we want to give some advice on when and how to properly water the plants in the garden. So here are some very simple rules.
What do we water?
Ideal for irrigation, of course, is rainwater (provided that the rains in your area are clean and do not take waste from a nearby industrial plant with them). It is useful to collect rainwater for future use; warm, it is even more useful. In addition to rain, there are usually two options: water supply and a well. Water from the tap, as a rule, contains a lot of iron salts, but the statement about its hardness is not always true; it depends on where your water supply comes from. If in a month a noticeable scale does not form on the kettle, you can safely water rhododendrons and hydrangeas with this water.
Water temperature for irrigation should be about 20 °. To do this, you can simply soak the water in a barrel, bath.
Well water is usually hard. You can make it softer baking soda(2-3 tablespoons per 10 liters of water), and only then apply for irrigation.
Plants should be watered only in the morning or in the evening, in no case in the heat, not in the sun!
How?
Who ran around the site with a watering can, this question will not seem idle. A 10-liter watering can per square meter is usually recommended, but this is only sufficient if watered daily. Even a little rain, dropping just a few drops, will moisten the soil more, because it will happen immediately over a large area, and neighboring dry areas will not dry out the watered. After high-quality watering, no dry layer should remain in the soil; this is easy to check with a scoop.
Vegetable crops should be watered less often, but plentifully, since with daily, but more meager watering, moisture will not reach the roots and there will be little sense from such watering. 
What and how?
Trees and large shrubs on loose, permeable soil can be watered by simply placing a hose under the roots for 40 minutes. This will not work on heavy clay soils: if the earth is dry, the water will simply drain over the surface. You will have to dig an annular groove, or at least a few holes in the near-stem circle, into which water is already poured. But it is best, of course, to dig porous tubes into the ground by 30-70 cm (the depth depends on the structure of the root system of the plant; you can dig several tubes to different depths).
The lawn is watered with a sprinkler - the more evenly the water is distributed, the smoother the greens will be. A sprinkler can also be used to water flower beds if there are no plants whose delicate petals suffer from water drops (petunias, morning glory, rudbeckia, lilies and roses of light colors, bearded irises, terry peonies). These plants are watered under the root. It is better to water the garden with warm water, so a watering can is usually needed here.
But the most convenient (and economical) way is drip irrigation, when an individual hose is connected under each plant. Special porous hoses are sold, but you can also dilute just thin tubes, like those through which an aquarium compressor supplies air. Water can be forced into the system by a pump or flow by gravity, for example, from a barrel located above the irrigation point. It is important to ensure that all watering points, if there are several, are at the same level, otherwise some plants will be watered better, others worse, and the water may not reach the top ones at all. You can adjust the intensity of watering by changing the lumen of the tubes using clamps or a multiplier-distributor with faucets (all this is sold in the same place as the rest of the irrigation equipment).
A drip irrigation option is inverted water bottles (usually placed under newly transplanted plants). Important - there should be no other holes in the bottle, except for the neck stuck into the ground, otherwise the water will pour out too quickly.
When? Classic - watering in the morning and evening hours; it is believed that in this case all the moisture goes to the plants without evaporating in the hot midday sun. An alternative point of view is to water when moisture is especially needed, that is, in the very heat. In fact, most often it turns out that we water when there is an opportunity. Who comes to the garden only for the weekend, in the heat spends them with a hose in hand. And, surprisingly, contrary to the gloomy forecasts of the neighbors, they do not get spots on cucumbers and holes on the hosts from water drops, the plants simply rejoice at the long-awaited watering.
Of course, not all plants need to be watered all the time. The very first watering, warm, almost hot water- after the snow has melted, if the ground is still frozen, and the sun is already hot. So we water in early spring evergreen rhododendrons, coniferous, emerging from wintering, to enable the roots to take moisture from the soil and thus avoid burning in the spring sun. If there is no rain in May, regular and plentiful, until the soil is completely saturated with water, watering of all plants during the active growing season is required.
In June, we stop watering spring-flowering bulbs that are retiring, excess moisture is now harmful to them. Flowers require good watering in the period from budding to flowering - the flowers will be larger. After flowering, most plants need a little rest from watering, normal rains are enough. Fruit trees are watered during the period of active growth of the ovaries, otherwise most of them will be dropped; the exception is, which pours better and does not rot if the topsoil dries out periodically.
Dried flowers and plants from which you plan to collect seeds are not watered from the moment when the fruits have reached a mature size.
Shrubs, especially those that cannot stop and start preparing for winter, are watered from mid-July only if it is completely dry.
In August, if it rains from time to time, we only water annuals that continue to bloom, and moisture-loving perennials, Siberian irises, and plants that have recently been transplanted (conifers and most perennials can be transplanted in the second half of August).
In September, evaporation is already so low that watering is not needed at all. But in early October, when the wintering buds have already formed and the shoots have stopped growing, the garden needs the last of the season, the so-called moisture-charging watering. Of course, if it rains at this time, and the soil is wet throughout the depth (it is advisable to check this, especially after a dry summer), it is not necessary to water.
And finally: if you need to feed the plants, then this must be done along with watering, otherwise they will not receive the right amount of nutrients.
To be both tasty and beautiful
- Raspberries, strawberries, and other berries are best picked in sunny weather, since most berries have the ability to absorb excess moisture. And having absorbed rain moisture, they will boil very quickly.
- If your plums, pears, apples are not very juicy, then it is good to use currant and raspberry juice as fillings when harvesting them.
- In order for fruits in jam, compote to cook evenly, cut them into strictly identical slices. Then they will not only be tasty, but also remain beautiful.
Modern confectionery is a real work of art. Baking is distinguished not only by its exquisite taste, but also by a whole set of aesthetic qualities. Cake with smudges is ideal for chocolate and white cakes. The icing looks very elegant and concise, and most importantly, you can cook it at home.
Watering the cake with chocolate: how to do it right?
Chocolate smudges - will decorate any cake, regardless of its type. The only thing to consider is that for filling a chocolate cake, it is better to take white chocolate, and for white cakes, black is ideal.
To create smudges, you should choose high-quality chocolate. Of course, you can replace the delicacy with confectionery crumbs, but we hasten to disappoint you - with it you will not achieve the desired consistency and that exquisite taste that, for example, has.
So, take the cake out of the oven and set it aside. It's time to melt the chocolate bar, which at the end of cooking will serve as a glaze for sweet pastries. Prepare:
- saucepan;
- a couple of glasses of water;
- a couple of chocolate bars;
- 50 ml cream.
Break the chocolate into small pieces, put them in a saucepan. We put the dishes in a water bath and melt it, we also introduce cream here. By the way, the procedure can be performed in the microwave. The only delicacy will lose its nutritional qualities.
Let the cake and chocolate mixture cool down. We put the pastry on the grate, and generously pour it with chocolate icing. You must control the height of the drips yourself, for this it is not necessary to use all the chocolate icing. If you want to further decorate the delicacy, then apply decorative edible decorations to the glaze that has not yet thickened. It can be sugar bows, chocolate chips or fresh fruit. Chocolate smudges are ready!
How beautiful to pour the cake with white chocolate?
A cake with smudges is exactly the kind of confectionery product that can be safely put on a birthday cake. will be an excellent coating for biscuits with the addition of cocoa. You can create some contrast. At what it will be not only visual, but also taste.

Expert opinion
Anastasia Titova
Confectioner
Tip: be sure to impregnate biscuit cakes with impregnation. Pay attention to confectionery impregnations from rum, liquor, orange, mango and strawberry syrup.
To prepare the glaze, prepare:
- a bar of white chocolate;
- a teaspoon of gelatin;
- 30 ml cream;
- 20 ml of condensed milk.
Melt chocolates in a water bath, add cream and condensed milk here. Set aside the mass. Melt the gelatin according to the instructions, and after it swells, add to the mass.
We put our cake on the grate, and generously pour it with white icing. Please note that in order to obtain the so-called smudge effect, the confectionery product should be immediately refrigerated. Be responsible when purchasing ingredients. When preparing white glaze, use fat condensed milk and cream. Such icing for smudges on the cake will look very appetizing!
How to make a cake covered with chocolate and decorated with berries?
The recipe for a cake with chocolate smudges and fruits will take its rightful place in your book. recipes. Before you decorate a confectionery product, you need to cook it. To prepare a biscuit, prepare the following products:
- a glass of flour and sugar;
- 5 eggs;
- salt and vanilla extract;
- a couple of tablespoons of melted butter.
In a separate bowl, beat the yolks with sugar, and proteins with a pinch of salt. We introduce a glass of flour, butter, vanilla extract and baking powder into the yolk mass. We knead the biscuit, and carefully introduce lush proteins. We bake the biscuit at a temperature of 180 degrees Celsius for about 30-40 minutes.
When the biscuit is cooked and cooled, cut it into a couple of even pieces. As an impregnation, you can take orange jam. To do this, mix a couple of tablespoons of jam with the same amount of water, knead the mass and generously pour the biscuit with a spoon. We debug the biscuit to the side and take up the preparation of the cream.
To prepare the cream, we take 250 grams of mascarpone, and 100 grams of butter and powdered sugar. Beat the mass in a blender, and apply to biscuit cakes. We connect them together. With the remaining cream, level the cake with a pastry spatula, and proceed to the preparation of chocolate icing.
To prepare the glaze, you should take:
- a bar of black chocolate;
- 30 grams of butter.
In a water bath, melt the chocolate bar and add the oil here. Allow the mass to cool and generously pour the top of the biscuit with glaze. While the mass is not frozen, we fix the berries on the cake. A berry mix of currants, strawberries, blackberries and raspberries is perfect. You can apply the berries in any order, but remember that before decorating the confectionery with berries, they must be washed. Now you know how to cover the cake with chocolate icing and berries. Enjoy your meal!
How to beautifully pour chocolate over a cake to make smudges?
The cake is already ready, but its appearance leaves much to be desired? And why not create smudges on the confectionery. To prepare the glaze, you only need two ingredients: cream and a bar of your favorite dark chocolate bar. Melt the ingredients in a water bath, and when the consistency becomes homogeneous, remove the dishes, and let the glaze cool slightly.
If you are a confectionery beginner, then it will be useful for you to know that you can practice creating beautiful smudges in Czech. To do this, take a cup, turn it upside down, use a teaspoon to pick up the icing and create a smudge strip. Happened? Now, all the same, try to create on ready-made homemade cakes.
We put the cake on the rack. Drizzle the confection generously with the glaze, but remember that you should leave 30% of the mass to create "perfect" smudges. Pour the frosting around with a teaspoon. We put the cake in the refrigerator. This will allow smudges to literally instantly grab onto the cake.
Cake "Lady's Caprice" - cooking secrets
Almost all representatives of the weaker sex have a sweet tooth. "Lady's Caprice" will amaze lovers of sweet pastries with the most delicate taste and spicy aroma, and to prepare a confectionery, you will need:
- a couple of glasses of sugar;
- 3 cups flour;
- 3 tablespoons of honey;
- butter packaging;
- baking soda and vanilla extract.
We drive eggs into a bowl, add sugar, honey, vanilla, soda and butter here. Thoroughly beat the mass until the lumps are completely dissolved. We put the mass on the fire and cook for about three minutes, stirring constantly. We add flour. Remove from heat and knead the dough.

We roll out sausages, create shortcakes from them and bake each separately until golden brown. While the cakes are baking, prepare the most delicate cream. To prepare the cream, prepare the following ingredients:
- a glass of sugar;
- a tablespoon of flour;
- a couple of chicken eggs;
- butter packaging;
- half a glass of milk.
Bring milk to a boil and remove from heat. Mix sugar, flour and eggs until smooth. We introduce milk, and put the cream on the fire. Cook until you get a creamy consistency. Remove from heat and add oil. The cream is ready.
We cover each cake with cream. You can use chocolate smudges for the cake to decorate baking. Glaze preparation options are presented above. Enjoy your meal!
Chocolate-covered zucotto cake
Chocolate cake, amazing filling and the original appearance of the confectionery, which is called "Zukkoto" - will conquer the most demanding gourmet. To prepare the dough, we need:
- a couple of eggs;
- one hundred grams of sugar and butter;
- 100 grams of sifted flour;
- 3 tablespoons of cocoa;
- a couple of teaspoons of baking powder.
Pour absolutely all dry ingredients into a bowl, except sugar, stir with a spoon and add slightly melted butter. Beat the eggs with sugar and add to the dough. The consistency of the dough should resemble thick sour cream.
Grease a baking sheet with butter, pour out the dough and bake at a temperature of 180 degrees Celsius for 20 minutes. Cool the finished cake, and use a bowl to cut out circles from it. We cover the same bowl with cling film, and put one of the chocolate shortcakes on the bottom. We set aside the bowl with the cake to the side, and proceed to the preparation of a gentle cream.
Half a glass of chopped nuts, mixed with crushed dark chocolate. Whip heavy cream with powdered sugar, and add the prepared dry ingredients. Stir with a whisk, additionally introduces 200 grams of chopped pitted cherries. The cream is ready.
We put the cream in a bowl with a cake, cover the cake with another biscuit and put it in the refrigerator for at least one hour. Prepare the dark chocolate and cream glaze, remove the pastry, and generously pour over it with a mass. It is best to fill the cake with chocolate according to the traditional scheme. Top the pastry with fresh cherries. Enjoy your meal!
One-two-three chocolate cake recipe
Guests on the doorstep and you do not know what to treat them? Then this recipe is made for you. To prepare a biscuit, you should stock up on the following ingredients:
- a glass of wheat flour;
- a teaspoon of soda;
- 50 grams of cocoa;
- a couple of eggs;
- 100 grams of softened butter;
- 3 tablespoons of vegetable oil;
- a glass of milk;
- vinegar;
- vanilla extract.

Mix cocoa, flour and soda. Here we add milk, butter, a teaspoon of vinegar, vanilla extract and chicken eggs. Intensively beat our dough with a mixer. You should not have lumps and other inclusions, so the procedure may take about 10 minutes.
Lubricate our mold with butter or vegetable oil, pour the dough and bake it at a temperature of 180 degrees for about 30 minutes. You can check the readiness with a toothpick. Do not rush to get the dough out of the oven. After baking, let it stand for another 10 minutes.
While the cake is cooling, prepare the frosting. A couple of chocolates, melt in a water bath, here we introduce 100 grams of butter and cream. If the mass is rare, swollen gelatin can be introduced into it.
We generously pour the freshly baked cake with icing, decorate it with fresh raspberries or any other berries, and send it to the refrigerator. The delicacy goes well with hot, cold and alcoholic drinks.
Modern sweet teeth love with their eyes, and there is nothing to be ashamed of. Now you know how to cover the cake with icing, and what ingredients you need for this. We buy high-quality chocolate, and enjoy the cooking process!
Did you like the recipe?
YesNot
Hi all. Today there will be the most burning topic - how to make beautiful smudges on a chocolate cake. This is the most popular request to my direct, everyone who was waiting - catch the article.
Chocolate smudges... This is perhaps the most common mistake made by beginners (unfortunately, not only beginners suffer from this, I often meet works and more experienced colleagues with ugly smudges). How to find that edge so that the smudges do not flow down in puddles on the substrate and at the same time do not lie in thick waves on the top? Today I will reveal the secret of my chocolate drips.
I will describe not so much the recipe as the technology itself. It is important here to understand the very essence of the process in which the drip will flow sexually on the cake, reaching its middle.
There are many recipes on the Internet on how to make chocolate smudges for decorating a cake. And you will be surprised, but almost all of them are working!
At one time I tried ganache for smudges both in butter and cream with the addition of butter. And today I will tell you the most elementary recipe for chocolate drips with cream, but not with 33% fat, but with the usual 10%. Yes Yes! Even with such cream smudges can be made beautiful. There are a lot of myths that chocolate will curdle in such cream. No no and one more time no! The fat content of the cream has nothing to do with it, smudges can also be made with 4% baked milk. This is a matter of practice.
Today I will prepare drips for a dark chocolate cake, but, as you understand, black, milk, and even white chocolate can be used. Proportions, respectively, will be slightly different. Each chocolate will have its own grammar! I never weigh, I measure everything by eye.
In this article, I will teach you to understand what needs to be done in different situations. And in the future, you yourself will experiment and everyone will find for themselves the most comfortable proportion for themselves.
So, how to cook streaks for a 10% chocolate and cream biscuit cake at home, a recipe with photos step by step.
Ingredients:
- bitter chocolate - 50 grams
- cream 10% - 40 grams
Cooking:
To begin with, I will write about preparation. The cake should be as cold as possible, which means that in the refrigerator it should stand leveled for at least 1-2 hours, and preferably all 4. If you recently covered it with a finishing layer of cream, then you can send the cake to the freezer for 30 minutes, to speed up the process. It is because of the difference in temperature that a cold cake is a warm chocolate ganache, and good smudges are obtained.
What kind of cream can make chocolate smudges? Yes, almost anyone! For us, the main condition is a smooth and cool coating. I make smudges on such creams as -, ganache, Swiss butter meringue (all creams are available via links). Smudges on these creams lie down without problems. Even on a mousse cake, smudges can be made, as in my version with
Before you start making ganache, take a clean glass cup and put it in the refrigerator to cool, then you will understand why we need it.

Let's get started on making the chocolate topping for the cake.
Break the chocolate into pieces and pour over the cream (I have the cream from the refrigerator, the temperature is not important here).

Let's send our bowl to the microwave for 30 seconds. We don't have to wait for all the chocolate to melt! So it can be overheated. The chocolate should slowly disperse from the warmth of the cream.
So, warmed up for 30 seconds. Take out and mix. At first, our mass will be lumpy, confidently interfere.

Slowly, the chocolate will disperse in the cream.
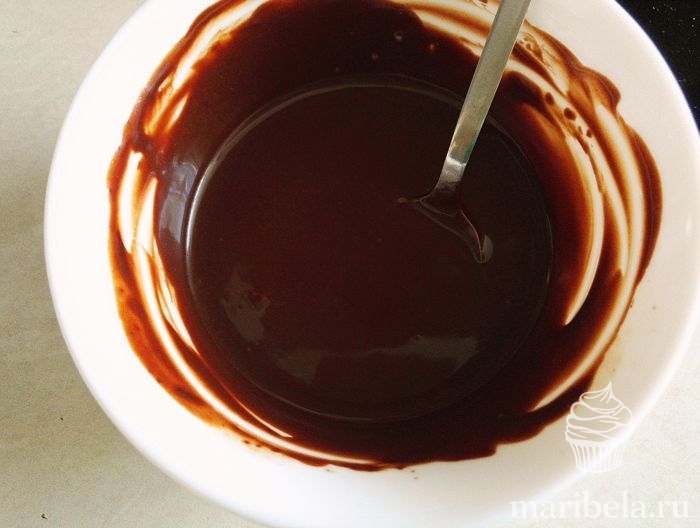
If there are pieces of unmelted chocolate left, then we send the bowl to the microwave for 10 seconds, no more! You can heat for a long time only the first time, then we heat only in impulses for 10-15 seconds, otherwise the chocolate will curdle.
So, warmed up. Take out and mix thoroughly again. You should get an emulsion without lumps and bubbles! Ganache should flow from a spoon with a ribbon, if it barely drips from a spoon, then the mass is too thick, you need to add more cream, literally half a teaspoon, do not add a lot at once. We mix everything and wait for the moment until the ganache will drain from the spoon.
Is it draining? Excellent. We take out a glass from the refrigerator and check our drips on it.
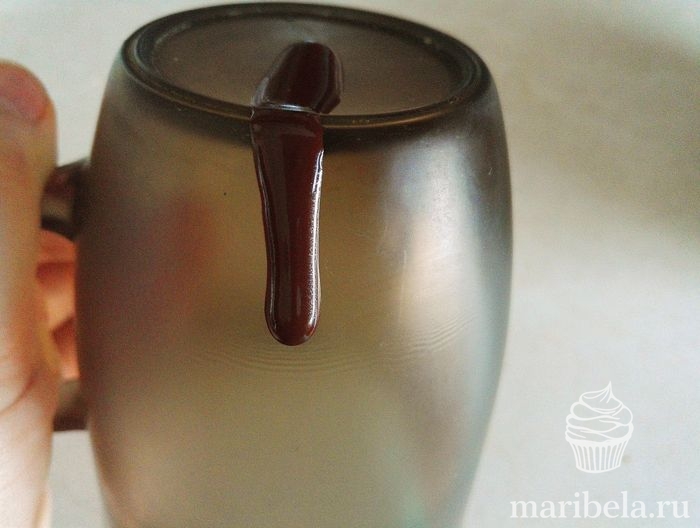
If the smudge reaches the bottom of the glass, then the mass is liquid, you need to add more chocolate. Literally a slice, added - mixed. Microwave for 10 seconds if needed.
Let's try again. Did the leak stop in the middle of the glass? Excellent.

We get the cake. We choose the ugliest side (of course, we must try to make the cakes perfectly even, but anything can happen). In this cake, the top coating is ganache, I experimented with a new recipe, and as you can see, the experiment has not yet been successful. We let the first drip, for this I choose a small spoon, you can also let smudges from a disposable bag. But I'm more comfortable that way. It is more difficult to control the length of the smudge with a bag, but with a spoon you can add drop by drop exactly where you want.
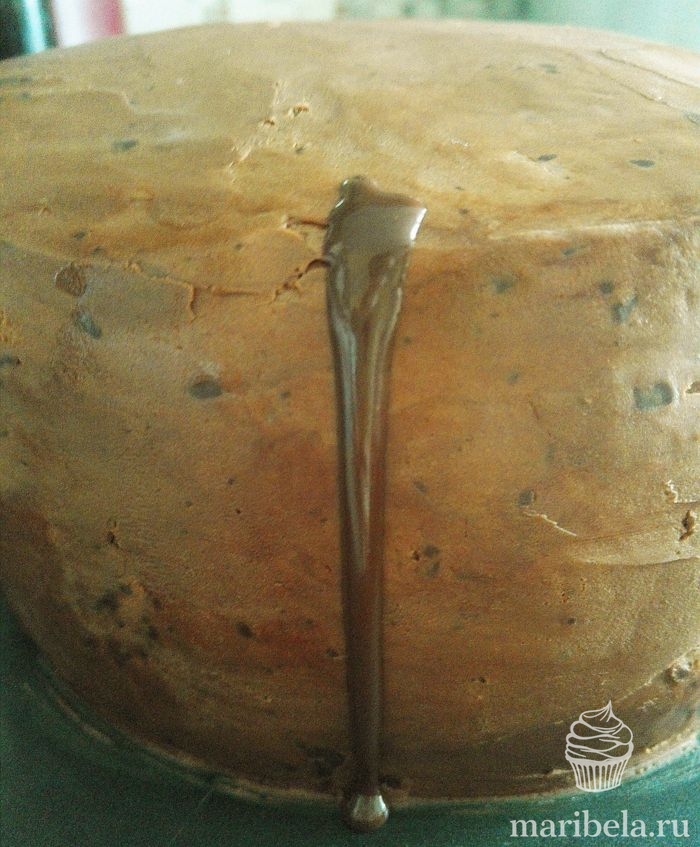
Let's start our smudge and look. So, if the smudge has reached the substrate, then either the temperature of the ganache itself is high (we try, it should not be hot for the hand), the working temperature is 27-30 degrees, or the ganache is liquid, then we add a little chocolate again. Melted, mixed.

Let's try again.

Did the drip freeze almost at the top? So the glaze is thick - add cream drop by drop, knead.

Let's run again. Did you reach the middle? Excellent! Feel free to water the entire cake. In the picture, I specifically gave an example of 3 smudges. The first is too long - the ganache is liquid, the second is too "fat" smudge from thick ganache, and the third is normal.
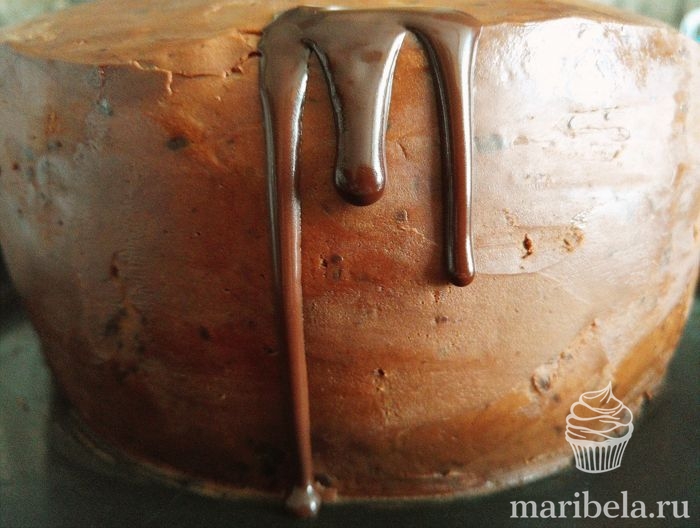
I do smudges first, run a spoon around the entire edge of the cake, and then pour over the top if it requires it.

If, as you start dripping, your glaze thickens, put the bowl in the microwave to warm up, literally for 5-10 seconds and continue.
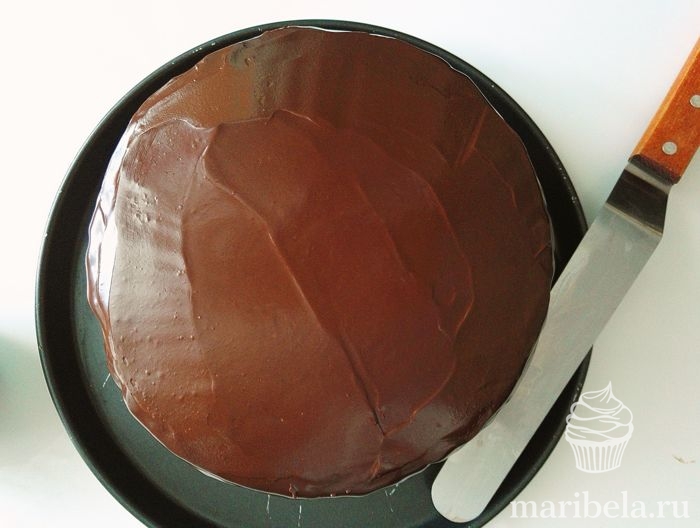
How to evenly fill the top of the cake with chocolate icing? Very simple. Pour the glaze into the center, take the spatula, heat it under hot water, wipe it off the water and level the surface, while turning the turntable (at the moment, I work in field conditions and there is no table at hand, because of this, my cake is not evenly covered with cream)

That's all! The surface of the cake is completely ready for decoration.
You can decorate the top of the cake with whatever you want. From banal sweets to figurines made of mastic, because, as you know, mastic does not flow on chocolate.

Perfect smudges of chocolate on the cake are ready.
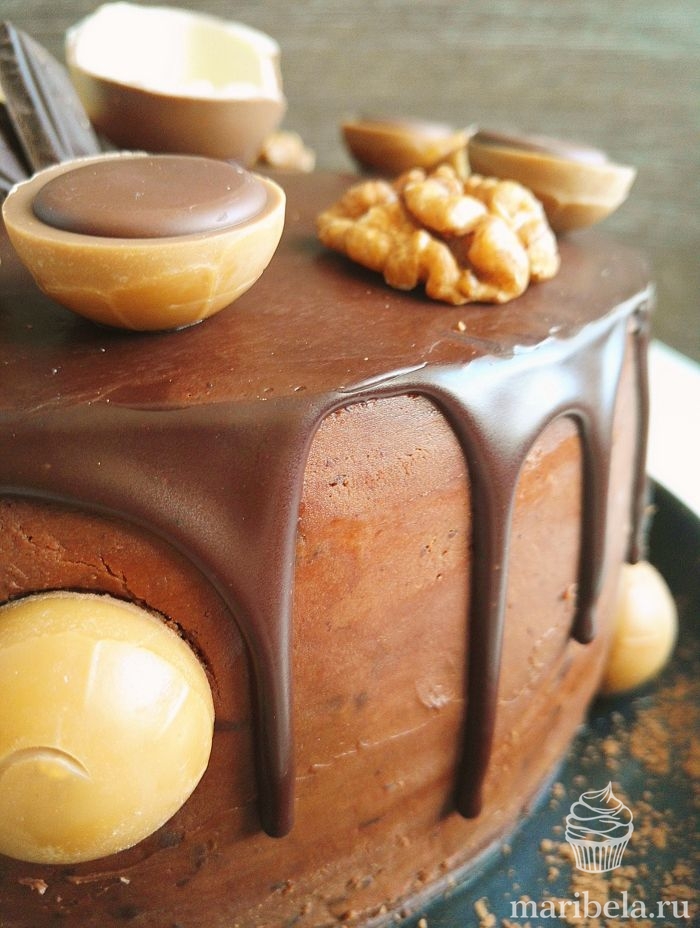
I hope you now have a clear understanding of the process. Drips - it's not difficult at all! With experience, you will measure everything by eye. Literally one trial lesson and chocolate smudges will submit to you.
What I want to add is that you don’t need to make a picket fence from smudges, it looks beautiful when the smudges are of different lengths: one is a little shorter, the other is a little longer. Their length can be adjusted with a spoon, letting somewhere a little more chocolate, somewhere, on the contrary, less. Well, in my opinion, one or two smudges of chocolate flowing down to the substrate are still acceptable, but when half flows down in puddles, it does not look very aesthetically pleasing.
I will publish the recipe for the cake itself the other day - do not miss it.

Enjoy your appetite.