French pedicure - elegant jacket for legs. Step by step french pedicure at home
As if smiling nails will probably never cease to be fashionable. French pedicure is relevant at any age and is suitable for almost all outfits. But drawing attention to the nails, if the legs are not well-groomed, is simply unthinkable. Therefore, French pedicure is necessarily combined with pleasant and effective procedures for rejuvenating the skin of the legs and eliminating minor imperfections.
Don't be afraid to fantasize
Familiar to all classic French pedicure - pastel colors of the base and bleached matte edging. And this is really a good combination: the nails look very young, neat, somehow even innocent (this is how the stronger sex is expressed, although it is difficult to imagine nails guilty of anything).
But the monotony gets boring pretty quickly. And here is the time to remember that a jacket can be very different: unthinkable color combinations, lines of different shapes, decorated with rhinestones, patterns, appliqués. The main thing is that the chosen image is appropriate for the occasion. We will tell you how to do a French pedicure at home - prepare the legs, process the nails, draw a straight line. And the choice of style is yours. Experiment, because errors are so easy to fix!
Spa treatments and nail preparation
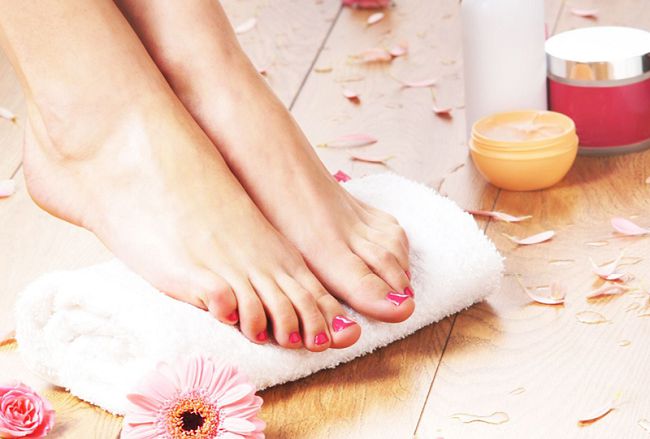
Oh Paris... Chocolate, caramel, coffee and creamy croissants, or maybe grapes and wine? So many delicious things! Why not turn a French pedicure into a small, albeit mental, tour of the Parisian streets? It is very simple to do this: we will pamper the legs with all kinds of delicacies, enjoying the magical aromas.
STAGE ONE: with tweezers or scissors, we give the nails the desired shape. Do not forget that you can not cut your nails very short - they can grow in. Yes, and the jacket looks better on slightly grown nails. With the help of a special tool, we dissolve the cuticles (or cut, as you are used to). We grind the nail plates with a soft nail file, leveling the grooves. If the nails are yellowish, whiten the surface with lemon juice - moisten the cotton pad with plenty and wipe thoroughly;
STAGE TWO: for ten minutes we relax the legs in a hot bath. To soften the keratinized areas, add sour wine and lavender oil to the water. The acid will gently dissolve dead cells - it will be easier to remove them later. To make a French pedicure at home perfect, do not overexpose your feet in water. If the nails absorb too much moisture, they will become porous, loose, and this will prevent the polish from being applied flawlessly;
STAGE THREE: We clean off all imperfections with a brush or pumice stone. Pre-apply creamy (cream and sugar) or coffee (ground coffee, olive oil, sugar or sea salt) scrub;
STAGE FOUR: not even defiant, a classic French pedicure at home can only be done on perfectly prepared fingers. Let the jacket seem inconspicuous, but it invariably attracts attention! Therefore, it is worth pampering the legs with a delicious wrap or mask: chocolate, cream, honey. You can use ready-made nutritional products on a natural basis;
STAGE FIVE: now the legs are almost perfect - fresh, clean, smell good, and no "natop" and calluses. It remains to prepare the nails for painting. However, if an opaque varnish is chosen, the first step is sufficient. But a translucent French pedicure will look decent only on perfectly polished nails. For this purpose, we use a suede block and a special powder. The smallest particles of powder will finally level the surface, in some places removing the excess, and in some places penetrating into the crack and sealing it. Instead of powder, you can use polishing wax or paste.
Coating
Probably every girl at least once did a French pedicure at home, but not everyone gets the perfect “smile”. Of course, you can use stencils, but they do not always repeat the chosen shape of the nails. Let's open a little secret on how to make a french pedicure without stencils, if you can’t draw a beautiful line in any way.
So, with a thin brush we draw a “smile”. Usually the width of the strip is about three millimeters, but the shorter the nails, the narrower the strip. Didn't quite work out? Well, okay! We take a thin cone applicator, dip it in nail polish remover and carefully trim the “smile” from the inner edge. With the same applicator we remove the blunders around the nails and from under the nails. That's it, the perfect french pedicure at home is almost finished! It remains to apply a translucent varnish and a fixative.
The second method is more “correct” and is suitable for those who either know how to accurately paint with varnish, or are trying to learn.
STAGE ONE: put on the base. It can be a fortified, healing or leveling agent of your choice. But the base must be: and the nails are protected from the chemistry that is part of the varnishes, and the varnish itself will lie more evenly;
STAGE TWO: apply a translucent pastel lacquer. Beige, pinkish, sandy - a matter of taste. We are waiting for complete drying. I would like the beauty to last as long as possible, since doing a French pedicure at home, with no experience at all, is not so easy. Therefore, it is better not to use a hair dryer, otherwise the varnish can quickly peel off;
STAGE THREE: draw a colored or white strip over a translucent background, apply a transparent fixer - you're done! If you are doing a french pedicure with a pattern or appliqué, be sure to wait until it is completely dry before applying the fixer.
About the color of the varnish - this, of course, is a convention. The base can be dark, the strip does not have to be even (diagonal, wave, etc.). There can be several stripes in general, contrasting or smoothly transitioning tones in one color scheme.
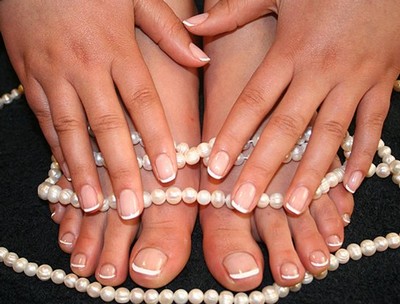
The ideal of style and sophistication is a French pedicure, combined with the same manicure. It is not difficult to make it, any woman who wants to put her legs in order can master the technology.
Advantages
Agree that it is difficult to choose the pattern and color of nail polish so that it fits any outfit and any shoes in the summer. Today you want to wear a bright dress, and tomorrow you are already drawn to dress in an exquisite white suit. Changing the varnish on the toenails is tiring. In this regard, the French pedicure is the perfect solution to the problem.
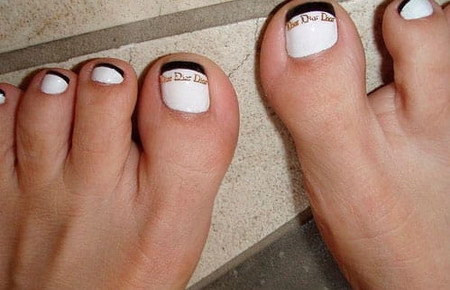
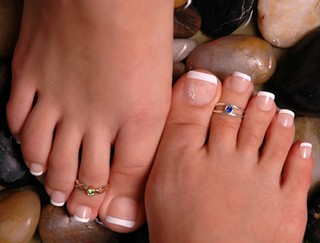
A French-style pedicure involves applying a natural color varnish with a highlight of the rim (top edge). Traditionally, the bezel is painted white, but today other options can be used.
As a result, the legs look neat, they can be put on any shoes, and it will always look elegant and harmonious.

Types of french pedicure
With the advent of new drawing techniques, with an abundance of decorating elements, colorful varnishes, sparkles, rhinestones, it is difficult for a woman to stay within the boundaries of the classics. So the French pedicure has undergone some changes, and today there are several types of it:
- classical;
- color;
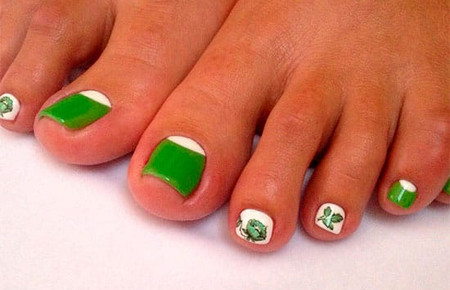
- with voluminous design;
- with an image.
Of course, this is a conditional division and everyone can offer their own version. Most importantly, be careful when applying varnish. Of course, you can use acrylic or gel polish, drying each layer with a lamp. In this case, the pedicure will last longer, because these are very resistant coatings, and toenails grow quite slowly.
classic pattern
The classic French pedicure requires the use of natural shades. It can be light beige, pale pink, ivory and other light colors. The edge of the nail along the arc is painted white. The thickness of the white line, also called the smile line, should be about 2 mm. You don't need to make it too thick.
But before you start applying the coloring composition, you need to put your legs in order. They are needed:
- steam in warm water;
- exfoliate rough skin;
- remove cuticles;
- moisturize and lubricate with nourishing oil.
It is important to give the nails the correct shape, cut off all unnecessary. Usually the edges are slightly rounded, and the top line remains straight, that is, the nail has a square shape. Only on well-prepared feet, a French pedicure will look great.
To draw a smooth white line around the edge, you can use a stencil. Fix the sticker at the required distance from the edge and swipe with a brush. As a result, you will get a perfectly flat strip. Remove the sticker when the varnish is dry so as not to smear it.
When using the gel, the smile line is drawn without a stencil, inaccuracies will need to be corrected manually, so the gel French pedicure should be done by the master.
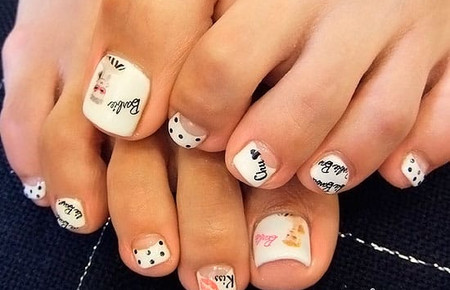
Colored pedicure
To revive the French pedicure and make it a little more original, the use of several shades along the edge of the nail or the selection of an unusual color helps.
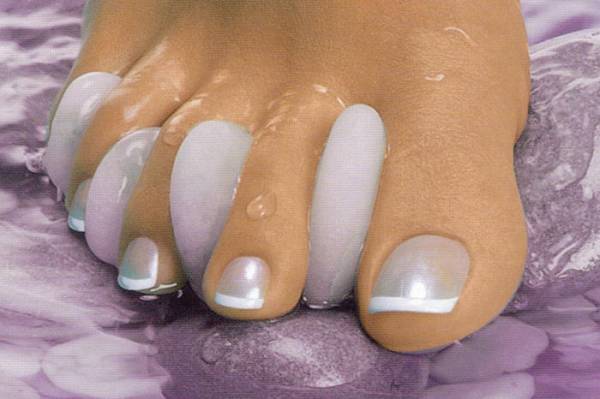
The nail plate painted in light lilac, sky blue or pearl colors looks great. You can combine the main glossy color with a matte edge.

drawing
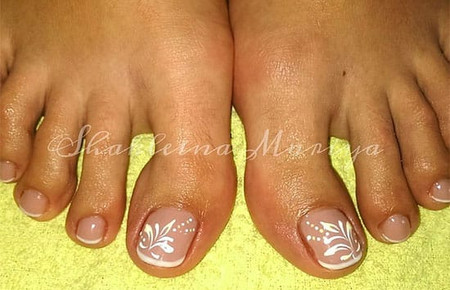
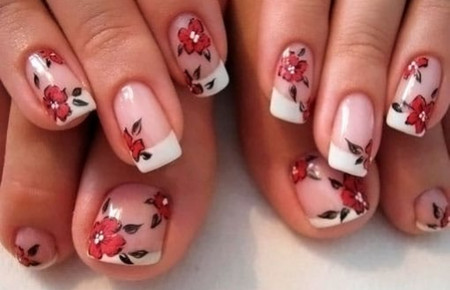
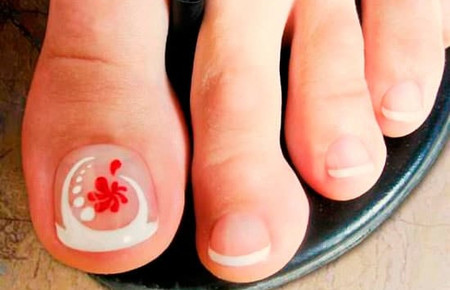
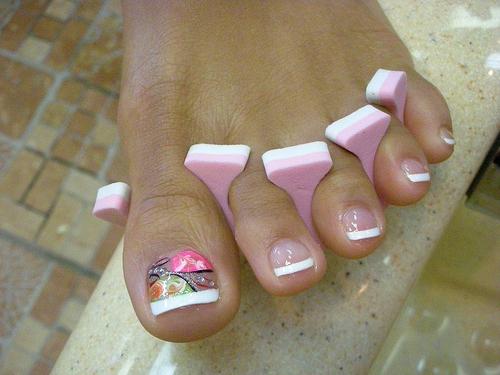
Often on the nail thumb apply a drawing, leaving the rest in two-tone. In this case, the French pedicure is perfectly combined with the pattern. Silicone stencils are used to draw details.
To create a unique pattern, use a nail art brush. Only professionals who have a firm hand and a good imagination can apply the brush on their own. First, they make a sketch, and only then transfer the picture to the nail plate.
If you liked some kind of pattern, then save it in a photo and show it to the master. So he can recreate the French pedicure with a pattern as accurately as possible.
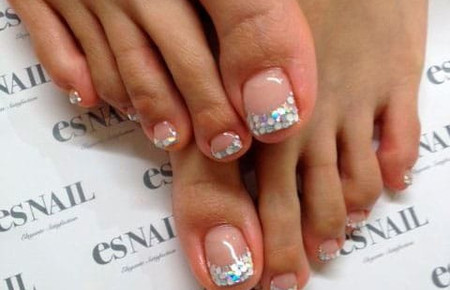
To create an original pedicure, glitter is used and rhinestones are glued. In this case, you can achieve the effect of volume. But this option is more festive than everyday, although with skillful execution it looks very beautiful.
Now not only a good manicure is an indispensable attribute of a successful girl, pedicure is also increasing in importance. If we talk about the simplest designs, then the jacket on the legs can be considered a trendsetter. This is a universal way to look good.
At the same time, a French pedicure does not involve long nails, since it will look unaesthetic on them. A small smile at the tip of the nail serves as a refreshing attribute rather than highlighting your nail length.
French pedicure has long been loved by girls, as well as the corresponding manicure. To make such a nail design, you must adhere to certain rules:
- The smile must be the correct width. Otherwise, your French pedicure will look like overgrown nails.
- Decorating the free edge with a white stripe should be done evenly and thinly. In this case, a French pedicure will look advantageous.
- If we compare French pedicure and manicure, then the first one lasts much longer. This is due to the fact that the growth of nails on the legs is slower. Therefore, if durability is important to you, it is best to do classic version in which the base coat will not differ from your natural nail color.
- The most convenient material for such a pedicure, and manicure too, is gel polish.
The popularity of gel polish for this type of design is easily explained. Firstly, this material does not dry out in the open air. Smile line correction can be performed until you get the perfect outline. Secondly, gel polish lasts for weeks, which means a significant extension of life. Even if a manicure with such a coating can withstand up to a month, then there is nothing to say about toenails.
Most often, it is recommended to do a French pedicure and manicure in classic white. This is due to the fact that this design is suitable for any style of clothing, age or situation. At the same time, a French pedicure at home can be done without problems. And if you want to make a festive version of it, then you can simply use rhinestones for decoration.
Doing it right
Any woman can perform a French pedicure at home. Of course, some practice is required, but the skill is acquired quickly enough. In general, a French pedicure is almost identical to the same version of a manicure, with the exception of small details.
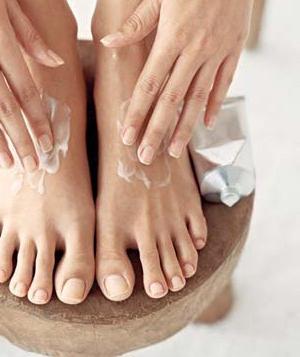
One of the main rules of this type of pedicure is careful foot care. Even flawlessly processed nails have no chance if rough, unkempt skin surrounds them. Therefore, the first stage of a pedicure is a thorough preparation of the feet, soaking the feet in a bath with oil or salt, peeling, scrub, filing the nails to the correct shape, as well as massage with a moisturizer.
After such a preparatory stage, you can directly perform a French pedicure, which can be decorated with rhinestones. Most often, a jacket is not done over a cut manicure. The basis of this design is simplicity. So, a special gel and an orange stick are more important here. With the help of the gel, you can soften the cuticle, and then simply push it to the edge of the nail, being careful not to damage it.
Most often, a square nail is cut out for work, especially if the natural shape is not very attractive. At the same time, you should not do any extraordinary forms. This is fraught with ingrown nails. With the help of a buff, the nail surface is polished. The key requirement of a French manicure, especially with rhinestones, is an absolutely flat surface.
The first layer is always the base-fixer. Its main task is to eliminate irregularities, as well as protect the nail plate from staining. In addition, the varnish applied to it lasts longer. If you have problems with nails, then you can use a special varnish for medical purposes.
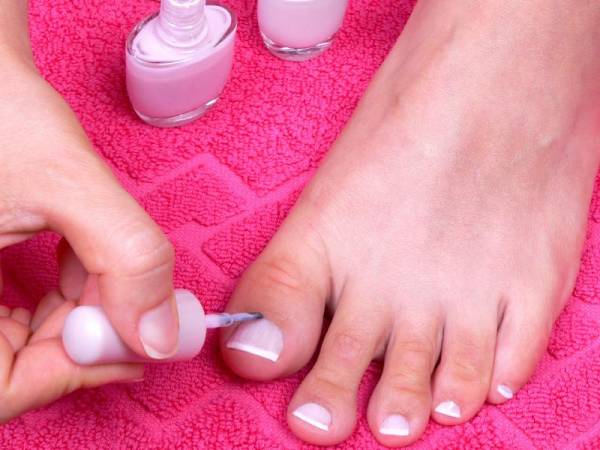
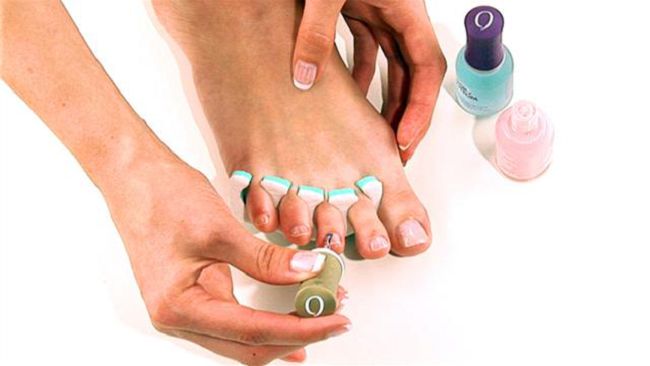
At home, it is easiest to make a jacket on your legs with the help of special stencils. However, if you have everything in order with artistic talent, you can simply use a thin brush with which white polish is distributed on the tips of your nails to form a smile. To do this, it is better to get a separate brush, the width of which will not exceed three millimeters.
For the main color, a pinkish or beige shade of varnish is ideal. The main feature of the classic jacket is the maximum naturalness. At the end of the procedure, cover the varnish with a fixative.
Design Options
If the classic French pedicure does not suit you, then you can diversify it. For example, try a base coat in a bright color. White goes well with red or scarlet. In this case, the procedure is repeated exactly as in the classical version.
By analogy, a jacket with rhinestones is also performed. This design is best suited for a holiday outfit. And if only one nail is decorated with rhinestones, then you can use it for everyday life. At the same time, working with rhinestones is not so difficult. You can fix them during the coating process by planting them on the varnish itself. Some experts work with glue, but this option is not the most successful.
It is not worth overdoing with such decorations. It is best to use small round rhinestones, laying one on each nail. You can also form a smile of your nails with them.
Any modern girl knows the true significance of a pedicure. Well-groomed legs always add charm to their owner. French pedicure and all its varieties already long time are popular and never go out of fashion. Its versatility and ability to match any outfit make it popular with girls. different ages. The jacket looks especially beautiful on a tanned body. At the same time, the pedicure is always neat and gives well-groomed feet.
Some girls believe that pedicures should only be done in the summer. However, this position is fundamentally wrong, since the legs need to be monitored throughout the year, so that in the summer you can wear open shoes without embarrassment.
Features of the French on the legs
- usually filed in the form of a square. In this case, the corners are slightly rounded. This ensures the accuracy of the pedicure.
- Particular attention, when performing a jacket on the legs, should be paid to foot care. After all, it provides the irresistibility of a pedicure.
- Be sure to cover the nail plate with a fixative. This procedure will help keep the jacket on your feet for a long time.
- The width of the edge of the nail, covered with white varnish, should be no more than 3 mm.
Girls who have not been given a beautiful plate by nature, or their nails are simply very brittle, are given the opportunity to build them up. You can make a French gel, on the legs this will serve its owner for about 3-4 weeks. You can also use acrylic.
French on legs is completely easy to do at home. This will save time and money.
The technology of creating a French pedicure at home
- First of all, it is necessary to peel the feet with a special tool.
- The cuticle must be softened with a gel, and then gently pushed back with a rubber or wooden stick.
- With a nail file, the desired shape is attached to the nail plate and polishing is carried out. At the same stage, the periungual bed is processed.
- Foot massage and moisturizing.
- The nail is covered with a colorless varnish. It is advisable to use a remedy.
- After the first layer has dried, the tips must be covered with white varnish (you can use special strips to help create a smooth line).
- The final step in creating a French pedicure is to apply a third layer of pink, beige, or preferably apply a fixer over the varnish, this will help preserve the beauty of the nails for a longer time.
 Even such a universal type of pedicure can be made exclusive. The jacket on the legs with rhinestones looks very elegant. You can use not only white varnish for the tips, but any desired colors. Nails can be decorated with painted lace. In general, this is a huge field for imagination.
In addition to beautiful nails, the owner of a French pedicure will receive well-groomed, soft skin of the feet. In addition, the technology for creating this pedicure will help maintain the health and beauty of the nail plate.
at home
French pedicure, or as it is also called French pedicure, is well-groomed feet with a neat coating of nail polish, along the cuts of which a white thin strip is drawn. Such a pedicure does not catch the eye, but it gives a special grace to the appearance of a woman.
A French pedicure is similar to a French manicure, but decorating the nail plate is just a part, increased attention is paid to careful care of nails and feet. They do it without the use of special scissors - they dissolve the cuticle with a special compound, and then move it with a wooden stick, which is made of orange wood; file correct the shape of the nail plate. As in French manicure, the nail plate is covered with a completely translucent varnish, it looks very natural, the color is chosen from beige to pink. Then applied to the free part of the nail plate (2-3 mm long) a strip of opaque white varnish.
Before applying varnish, you must make a light foot peeling and foot massage using a moisturizer. And to make a really beautiful French pedicure, you must follow special rules. This is what we'll talk about today.
Nail care rules
Let's start with the nail plates - they need to be put in order.
French pedicure. Rule number 1.
Let's cut our nails not too short. Not very short - it is flush with the skin of the leg, gently round the edges. It doesn't matter what device you use for this - it can be nail clippers or nail scissors (whatever suits you best).
French pedicure. Rule number 2.
We take a large saw in our hands. We file the nails so that there are no scars and clues. Next, you can level the surface of the nail plate - we take a polishing file, or an ordinary (soft!) File and grind the surface with it so that the nails become white and smooth.
French pedicure. Rule number 3.
 For this step, we need a fat cream. Massage the creamy mass onto the fingers and nails. Particular attention should be paid to the holes - strips located at the very base of the nail.
French pedicure. Rule number 4.
Foot bath. We lower our legs into a bath with warm water, it is desirable that it be soapy, for a better effect we add essential oils(this will soften and prepare the nails for the pedicure).
French pedicure. Rule number 5.
It's time for an emollient cream. Apply it on your legs in the same way as in point #3. You can use hand cream, but this is a last resort. Remember, a good foot moisturizer should always be on hand.
French pedicure. Rule number 6.
We take care of the feet and heels with a scrub, pumice stone or very carefully acting with a double-sided scraper. You can read more about heel care here.
French pedicure. Rule #7
We move the cuticle (this is the skin that is located along the perimeter of the nail plate) with a wooden stick. Next, rinse your toes with cool water and dry with a towel.
French pedicure. Rule number 8.
When moisturizing your legs with a cream, do not forget that you need to massage the entire leg, and not just its individual parts: from the fingers to the very ankle.
French pedicure. Rule number 9.
After these simple procedures, we begin to deal directly with the French pedicure. So: How to do a french pedicure at home...
We will need: base transparent varnish, white matte varnish, beige pearl varnish (or pale pink - to choose from), fixing varnish, wooden stick or thin brush, nail polish remover, cotton wool or cotton swab, white pencil.
We apply a layer of base clear varnish on the nails and dry for a while. Next, using a wooden stick or a thin brush, apply a white strip along the edge of the nail. If there are "flaws", remove them with a cotton swab dipped in nail polish remover or 10% peroxide solution. The line should be about 3 mm. Treat all fingers in the same way.
When the strips are dry, apply a layer of soft pink or beige varnish on top, just let them dry.
We complete the work with the nails by applying a transparent fixative varnish.
Make sure that all layers are dry, take a white pencil or cotton swab (previously dip it in nail polish remover) and whiten the area under the nails.
Voila! French pedicure is ready! Everything is quite simple. The main thing is to find time for yourself!